2022-08-21
7 min read
End-to-end test a Deno webapp using deno-puppeteer
The deno-puppeteer library
-- created by Deno team member Luca Casonato -- is a Deno-compatible port of the
puppeteer Node (npm) library. The library has a number of
uses including generating app screenshots and automating form submissions. We
are using it here to do end-to-end (e2e) testing of a Deno webapp. The code for
this blog post can be found
here.
App Setup
Although puppeteer and deno-puppeteer can be used to e2e test any webapp, we are going to test the default Fresh app created with this command-line (assuming Deno has been installed):
deno run -A -r https://fresh.deno.dev using_deno-puppeteerThe new project will be found in the using_deno-puppeteer folder. Moving into
that directory, the app can be started in that folder:
deno task startThe resulting page at http://localhost:8000 looks like this:
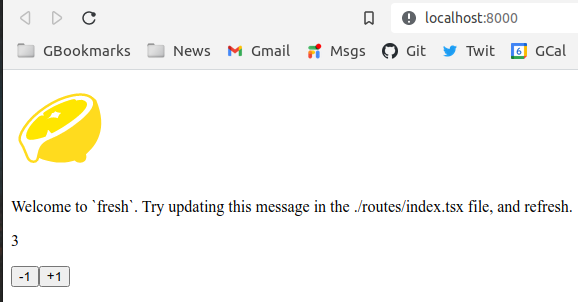
Using deno-puppeteer for e2e testing
Imports
A puppeteer.test.ts file is created to hold the tests. Inside that file, the
deno-puppeteer library needs to be imported:
import puppeteer, {
  Browser,
  Page,
} from "https://deno.land/x/puppeteer@14.1.1/mod.ts";
The Browser and Page classes are used in type annotations, while puppeteer
does the library's work.
We are going to use the bdd library in the deno_std testing module to run our
puppeteer e2e tests. That library includes the familiar functions describe,
beforeAll, afterAll, beforeEach, afterEach and it imported like this:
import {
  afterAll,
  beforeAll,
  describe,
  it,
} from "https://deno.land/std@0.151.0/testing/bdd.ts";
We will also need assert functions found in the deno_std testing module to verify test results:
import {
  assert,
  assertEquals,
  fail,
} from "https://deno.land/std@0.151.0/testing/asserts.ts";
Finally, we need to add the readlines function from the standard io library
to capture subprocess stdout messages in a helper function (see below).
import { readLines } from "https://deno.land/std@0.151.0/io/mod.ts";Test setup and cleanup
Behavior-driven development test libraries (like the popular
Jest lib) include a describe function to wrap a test
suite and it for test functions. Also included are beforeAll and afterAll
functions used to initialize and cleanup test resources. These functions run
before and after all tests are run. There are also beforeEach and afterEach
functions to allow code to be run before and after each test runs (not used
here).
Our puppeteer tests have app server (server), Browser and Page objects
that need to be declared at the top of the describe block since they are used
in the `before' and 'after' functions.
describe("e2e tests using puppeteer: ", () => {
  let server: { close: () => void };
  let browser: Browser;
  let page: Page;

  beforeAll(async () => {
    server = await startAppServer();
    browser = await startBrowser();
    page = await browser.newPage();
    await page.setViewport({ width: 400, height: 200 });
  });

  afterAll(async () => {
    await page?.close();
    await browser?.close();
    await server?.close();
  });

  // test functions next. . .
});
The app server, browser and page objects are used in all tests, so they are
initialized in the beforeAll function and closed in the afterAll function.
The close calls prevents the occurrence of 'leaking resources' errors. Make
sure that the page object is always closed before the browser object.
Note that the server, browser and page variables need type annotations to
avoid TypeScript 'implicit any' errors.
Helper functions
The startAppServer and startBrowser functions abstract the mechanics of
starting the Fresh app server that serves the webapp and the puppeteer browser
which we will run in headless mode to allow the tests to run in a CI/CD
environment.
/**
 * Run the Fresh server locally.
 *
 * @returns {{close: () => void}}: A handle to the server allowing closing of the server sub-process and
 * stdout/stderr within that.
 */
export async function startAppServer(): Promise<{ close: () => void }> {
  const serverProcess = Deno.run({
    // Fresh command line without the wait flag
    cmd: [Deno.execPath(), "run", "-A", "dev.ts"],
    cwd: Deno.cwd(),
    stdout: "piped",
    stderr: "piped",
  });
  console.log("Waiting for server to start...");
  //  Display some stdout messages.
  for await (const line of readLines(serverProcess.stdout)) {
    if (line.includes("Listening on http")) {
      console.log(line);
      break;
    }
  }
  return {
    async close() {
      await serverProcess.stdout.close();
      await serverProcess.stderr.close();
      await serverProcess.close();
    },
  };
}
/**
 * Start the puppeteer browser in headless mode
 *
 * @returns {Promise<Browser>}: Resolves to a puppeteer Browser instance
 */
export async function startBrowser(): Promise<Browser> {
  const browser: Browser = await puppeteer.launch({
    headless: true,
    args: ["--no-sandbox"],
  });
  return browser;
}
Test functions
Individual tests are found in it functions:
it({
  name: "should display welcome message",
  fn: async () => {
    await page.goto("http://localhost:8000/", {
      waitUntil: "networkidle2",
    });
    const selection = await page.waitForSelector("body > div > p");
    if (selection) {
      const text = await page?.evaluate(
        (element: HTMLElement) => element.textContent,
        selection,
      );
      assert(text?.startsWith("Welcome"));
    } else {
      fail(`ERROR: Selector not found`);
    }
  },
});
Once the page.goto function runs and navigates to the page to be tested. All
tests in this file work on the same page. The page.waitForSelector is called
with a CSS selector pointing to the DOM node on the page to be verified. In this
case, we are verifying that a message that starts with 'Welcome' exists at that
spot. We use the page.evaluate to obtain the text content (i.e. the message)
from the HTMLElement.
The function of the counter component is tested in the next two test functions. We want to know that the increment (+1) and decrement (-1) buttons work properly.
it({
  name: "should decrement counter",
  fn: async () => {
    await page.goto("http://localhost:8000/", {
      waitUntil: "networkidle2",
    });
    // TODO: Get counter text for later decrement comparison
    // click -1 button
    await page.click("body > div > div > button:nth-child(2)");
    // check to see if counter has decremented
    const selection = await page.waitForSelector("body > div > div > p");
    if (selection) {
      const text = await page.evaluate(
        (element: HTMLElement) => element.textContent,
        selection,
      );
      // counter should be 2 now
      assertEquals(text, "2");
    } else {
      fail(`ERROR: Selector not found`);
    }
  },
});

it({
  name: "should increment counter",
  fn: async () => {
    await page.goto("http://localhost:8000/", {
      waitUntil: "networkidle2",
    });
    // TODO: Get counter text for later increment comparison
    // click +1 button
    await page.click("body > div > div > button:nth-child(3)");
    // check to see if counter has decremented
    const selection = await page.waitForSelector("body > div > div > p");
    if (selection) {
      const text = await page.evaluate(
        (element: HTMLElement) => element.textContent,
        selection,
      );
      // counter should be 4 now
      assertEquals(text, "4");
    } else {
      fail(`ERROR: Selector not found`);
    }
  },
});
The page.click function is used to click a button found at the DOM node
defined by the CSS selector. Once the button is clicked, the DOM node containing
the counter's value is found and verified to have been incremented or
decremented (note that the Fresh app sets the counter's start value to 3).
Test output
The command line to run all tests (deno test --no-check-A) has been
encapsulated in the deno.json file as task 'test'. You run that with
deno task test. When that is done, the following output should appear:
$> deno task test
Warning deno task is unstable and may drastically change in the future
Task test deno test --no-check -A
running 1 test from ./puppeteer.test.ts
Puppeteer e2e testing...  ...
------- output -------
Waiting for server to start...
Listening on http://localhost:8000/
----- output end -----
  should display welcome message ... ok (1s)
  should decrement counter ... ok (1s)
  should increment counter ... ok (1s)
Puppeteer e2e testing...  ... ok (4s)

ok | 1 passed (3 steps) | 0 failed (5s)
Puppeteer API
There are a number of functions found in the Puppeteer API that I have not covered here. Here are few of the highlights:
Page.selectto target a drop-down or select element.Page.typeto type text into an input box.Page.waitForFunctionwaits for a function to finish evaluating.Page.screenshotto take a screenshot of the current page.Page.pdfto create a pdf of the current page.
Conclusion
As stated previously, complete source code for the example in this article is available here. Please note that the current versions of the libraries used in this example will change with time.
While I used Fresh for this work, I learned how to use deno-puppeteer when I created e2e tests for the Ultra full-stack Deno framework. I want to thank Omar Mashaal and James Edmonds for their assistance in this effort.
I'd also like to thank Kyle June for reviewing previous versions of this post.
The deno-puppeteer library can now be combined with Deno's build-in testing modules to allow the full testing pyramid to be done in a Deno-native way.